Configuring Webhook Receiver
A Webhook Receiver channel is a named instance of a REST endpoint configured to receive incoming data into the Cloud.
The incoming data must be in JSON format and is typically an event stream that describes user activity representing either real-time or historical event data. Each incoming data point in the data stream can be associated with an individual user or more users.
There are two types of events you can send to a Webhook Receiver channel:
- Events for an individual user that may originate as:
- Data about purchase transactions conducted on a Point-of-Sale (PoS) system relayed by a PoS listener to Session AI
- Smartphone devices doing online transactions
- Data from a back-end transaction processing system that describes individual users' activity
- System events that apply to all users, e.g., market data describing the movement of stock price
Adding New Webhook Receiver Channel
- In the Integration menu, click the Data Channels tab.
- On the Data Channels page, under All tab, hover over the Webhook Receiver channel.
- Click the Edit
 icon.
icon.

The Webhook Receivers screen displays all the added Webhook Receiver channels.
4. Click the Add a Channel located in the upper right corner of the page.

The Webhook Receiver screen displays the channel settings.
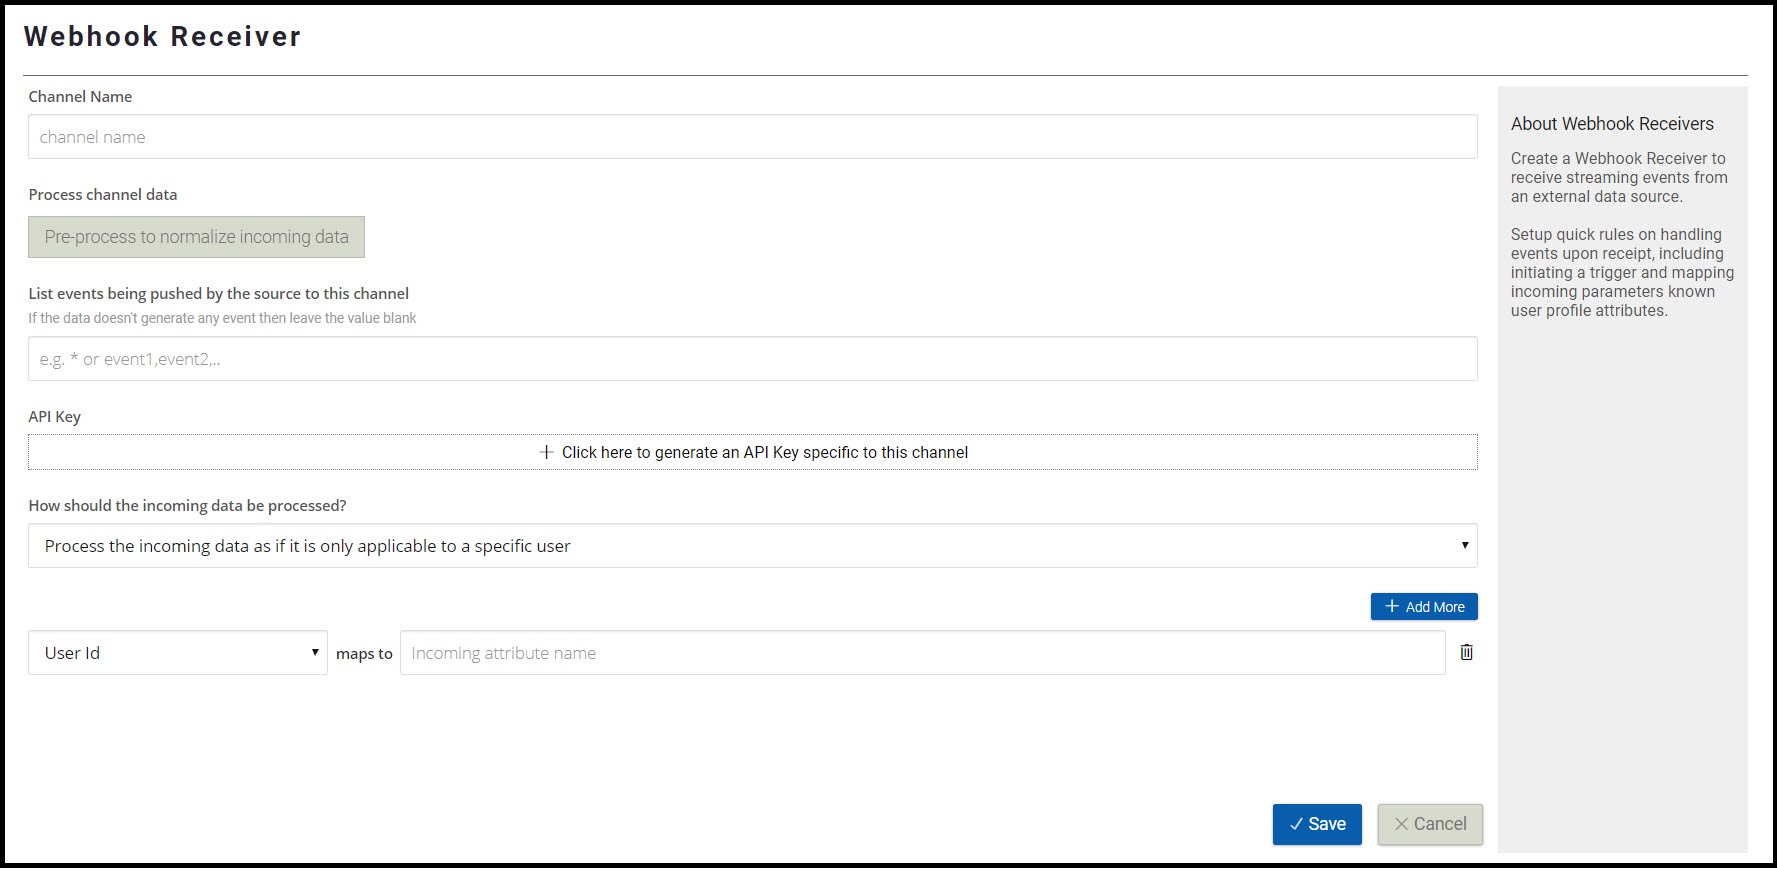
5. On the Webhook Receiver screen, enter the following details:
- Channel Name: Enter the appropriate name for a channel.
- Process channel data: Click the Pre-process to normalize incoming data button to write code to transform incoming data into events.
- Click Save.
- List events being pushed by the source to this channel: You can enter one or more event names in a comma-separated format. These events are pushed to Session AI via this channel.
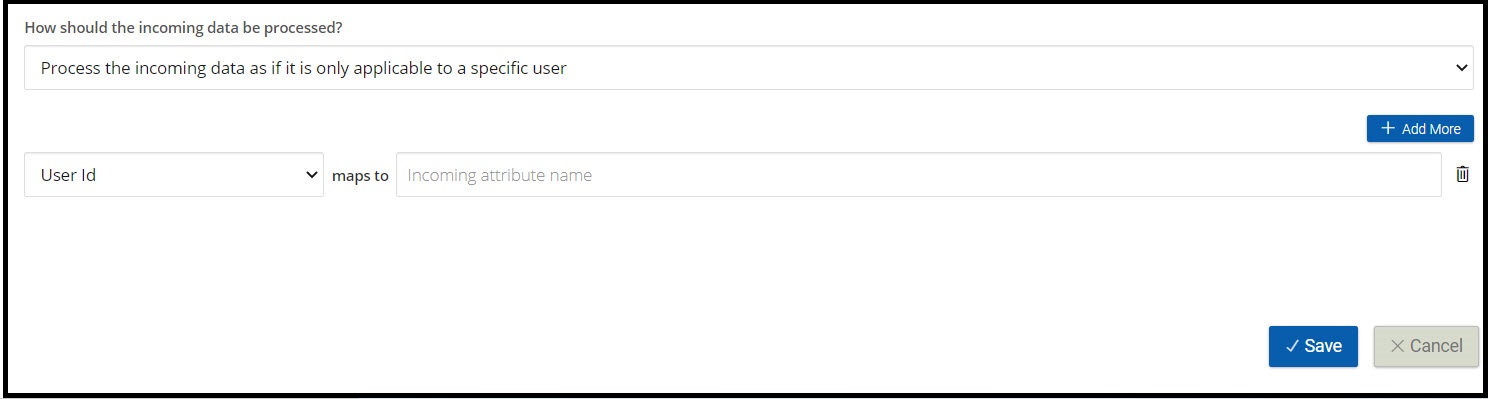
- How should the incoming data be processed?: From this drop-down list, select the appropriate option.
- Process the incoming data as if it is only applicable to a specific user: The incoming data is mapped to an existing user, identified by the field mapping you provide below.
In the below example, the User Id field is mapped to cid , a customer ID attribute in the incoming data. You can map one or more customers to incoming attributes. - Process the incoming data as a system event that can be applied to one or more users: If you select this option, then the data field mapping options are hidden.
- Process the incoming data as if it is only applicable to a specific user: The incoming data is mapped to an existing user, identified by the field mapping you provide below.
- Click Save.
The Webhook Receivers displays the newly created Webhook Receiver.
- After you save, the created webhook receiver appears on the added channel's screen and is assigned a REST endpoint using its name and the system on which it is created:
- For example, https://{systemname}/public/api/v1/event?channel={yourchannelname}.
- Use this REST endpoint when sending data to your Webhook Receiver
- The Webhook Receiver must be accessed using an API key specific for the channel or the Master API key.
- To generate an API key specific to the channel, open the generated Webhook Receiver and click the Click here to generate an API Key specific to this channel option.
- The API key is generated for your Webhook Receiver and can be used to access it.
- Pre-processing incoming data in the Webhook Receiver Channel:
- You can preprocess the data coming into your Webhook Receiver channel, before passing it on to Session AI, by adding the pre-processing code to your created Webhook Receiver.
- To achieve this, click the pre-process to normalize incoming data button and add your javascript code to process the incoming data as per your needs. You can use any of the code snippets available on the right pane in your javascript code.
Pre Processing ScriptIf you add any javascript code in the pre-processing script of your Webhook Receiver channel, then you must add the mapped attributes to the channel context and add the events back to the channel. The following is a sample pre-processing code.
- Note that the below-mentioned example javascript code is written to process incoming data associated with just a single user:
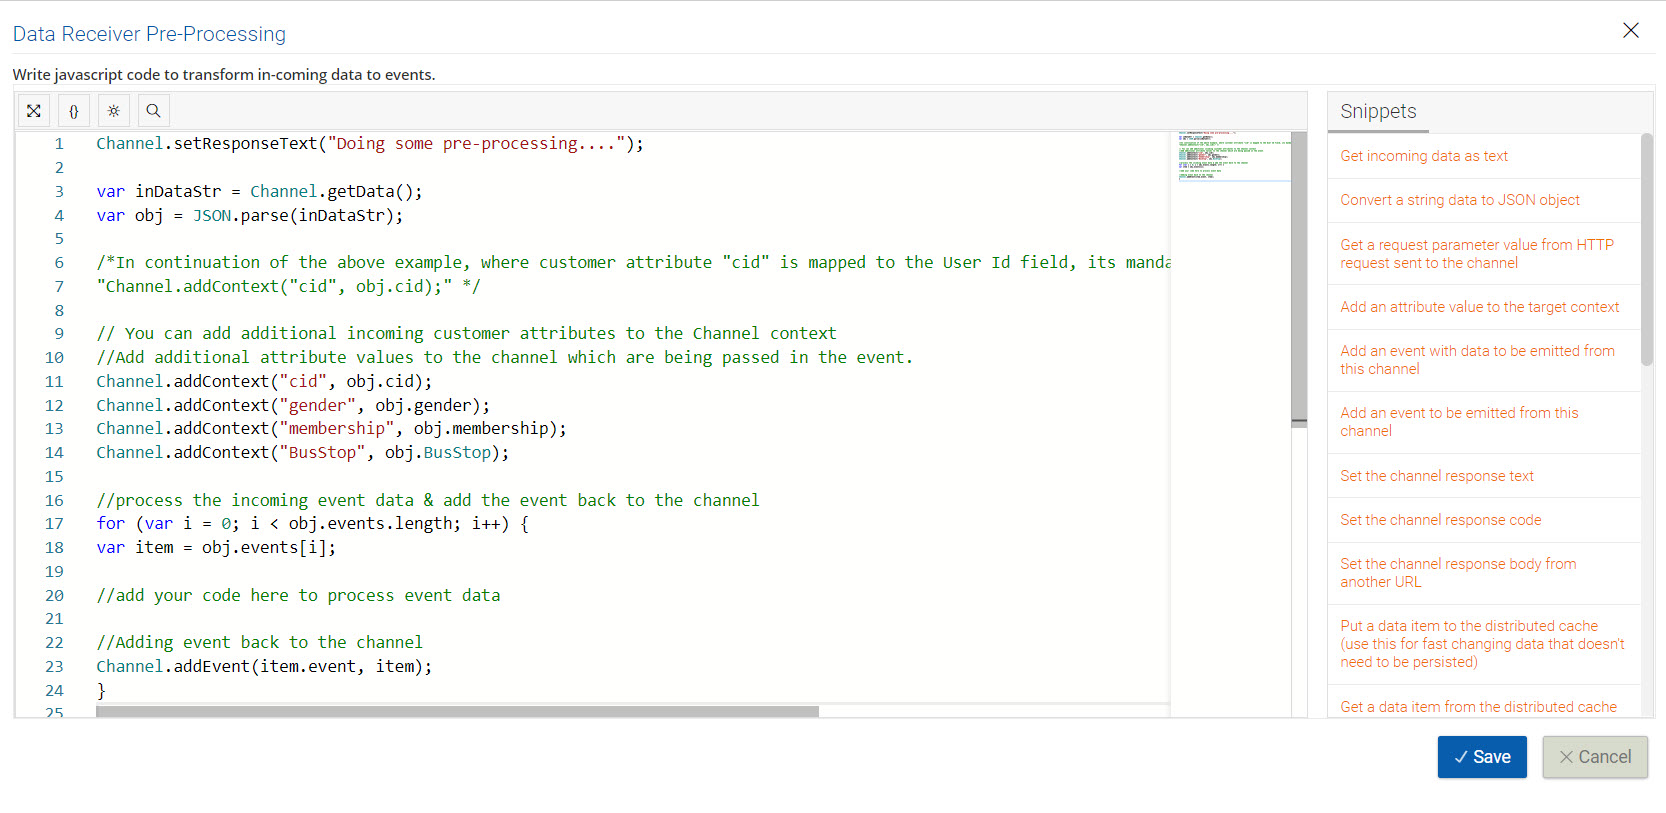
- Save the pre-processing code and send event data to the Webhook Receiver to test it using curl or Postman as shown in the below example.
Editing Webhook Receiver Channel
To Edit or Delete an Existing Webhook Receiver Channel, follow the steps given below:
- In the Data Channels tab, under All , hover over the Webhook Receiver channel.
- Click the Edit icon.
The Webhook Receivers screen displays all the added Webhook Receiver channels. - In the Webhook Receivers screen:
- To edit a Webhook Receiver channel, click the desired Webhook Receiver channel and perform the desired changes.
- To delete a Webhook Receiver channel, hover over the rightmost corner of the desired Webhook Receiver channel and click the Delete icon.
Using Webhook Receiver Channel
This section gives an example of how to use a Webhook Receiver channel to receive the incoming data.
Setup Webhook Receiver to Process Incoming Data for a Specific User
- To send data to a webhook receiver for an individual user, ensure while creating your Webhook Receiver, you use the Process incoming data as if it is only applicable to a specific user option and provide the required field mapping.
Note: In the below example, the User Id field is mapped to the customer id attribute "cid" present in the incoming data.
This example shows sending data to the Webhook Receiver using Postman application:
- The following fields are mandatory in Postman UI to construct a valid HTTP Post Request for the Webhook Receiver:
- HTTP Request: POST
- POST URL: Use the REST URL generated for your Webhook Receiver channel
- Headers:
- apikey: Enter the API Key for your channel or the Session AI Master API key
- Content-Type: The value is application/JSON.
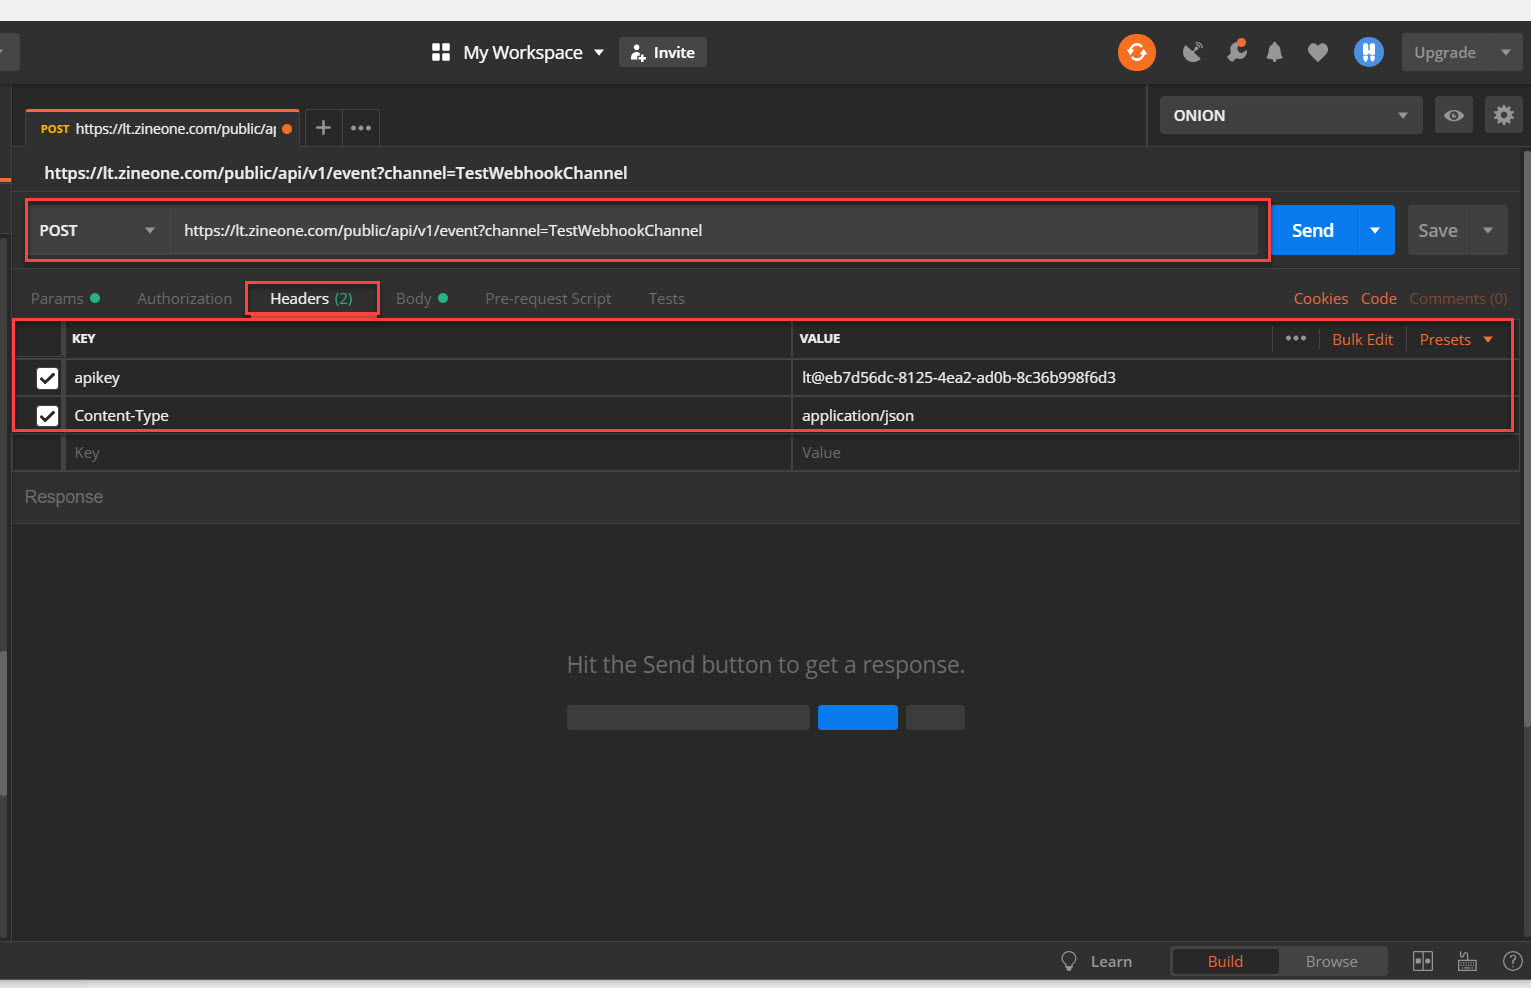
- Body: The payload is in JSON format, which must have these mandatory sections:
- One or more attribute fields that are mapped in the Webhook Receiver settings.
- An array with a key name "events"
- One or more elements of the array, each of which must contain a key named "event", with any of the additional event attributes as required.

PayloadThe payload must have "cid" attribute, which was mapped to user ID in the Webhook Receiver settings.
Once the Session AI Webhook Receiver receives the data from the Postman application, you can check the user profile details in C3 to verify if the user attributes are updated correctly.
Verify the Attributes Updated in the User Profile
- In the Data menu, click the Customer Search tab.
The Customers Search screen will be displayed - In the Customer Search tab, perform the following:
- Select the "Customer Id" option.
- In the text box, enter cid as the Customer Id. The cid attribute was mapped in the Webhook Receiver and sent in the incoming data.
- Click the Search.
The Customers Profile screen displays the details of the identified user profile. - Go to Customer Profile and verify the profile attributes which were passed in the incoming data.
Updated about 1 year ago